This post may contain affiliate links. Please read our disclosure policy.
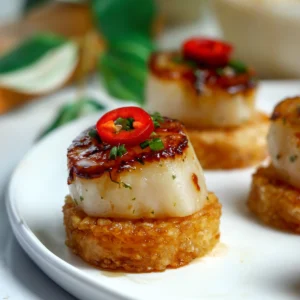
This Scallop Crispy Rice is a variation on my original Crispy Rice with Spicy Tuna (Nobu-Style). This swaps the spicy salmon for U-10 sea scallops that are seared in unsalted butter for a rich, golden crust. The base is made from Calrose sushi rice seasoned with kombu, rice vinegar, and cane sugar, then fried in olive oil until perfectly crunchy. A sweet and savory glaze of Tamari, sesame oil, agave syrup, and sriracha adds depth and heat. Finished with fresh chives and sliced Fresno chiles, these bite-sized appetizers offer a technical balance of textures and elevated flavors.
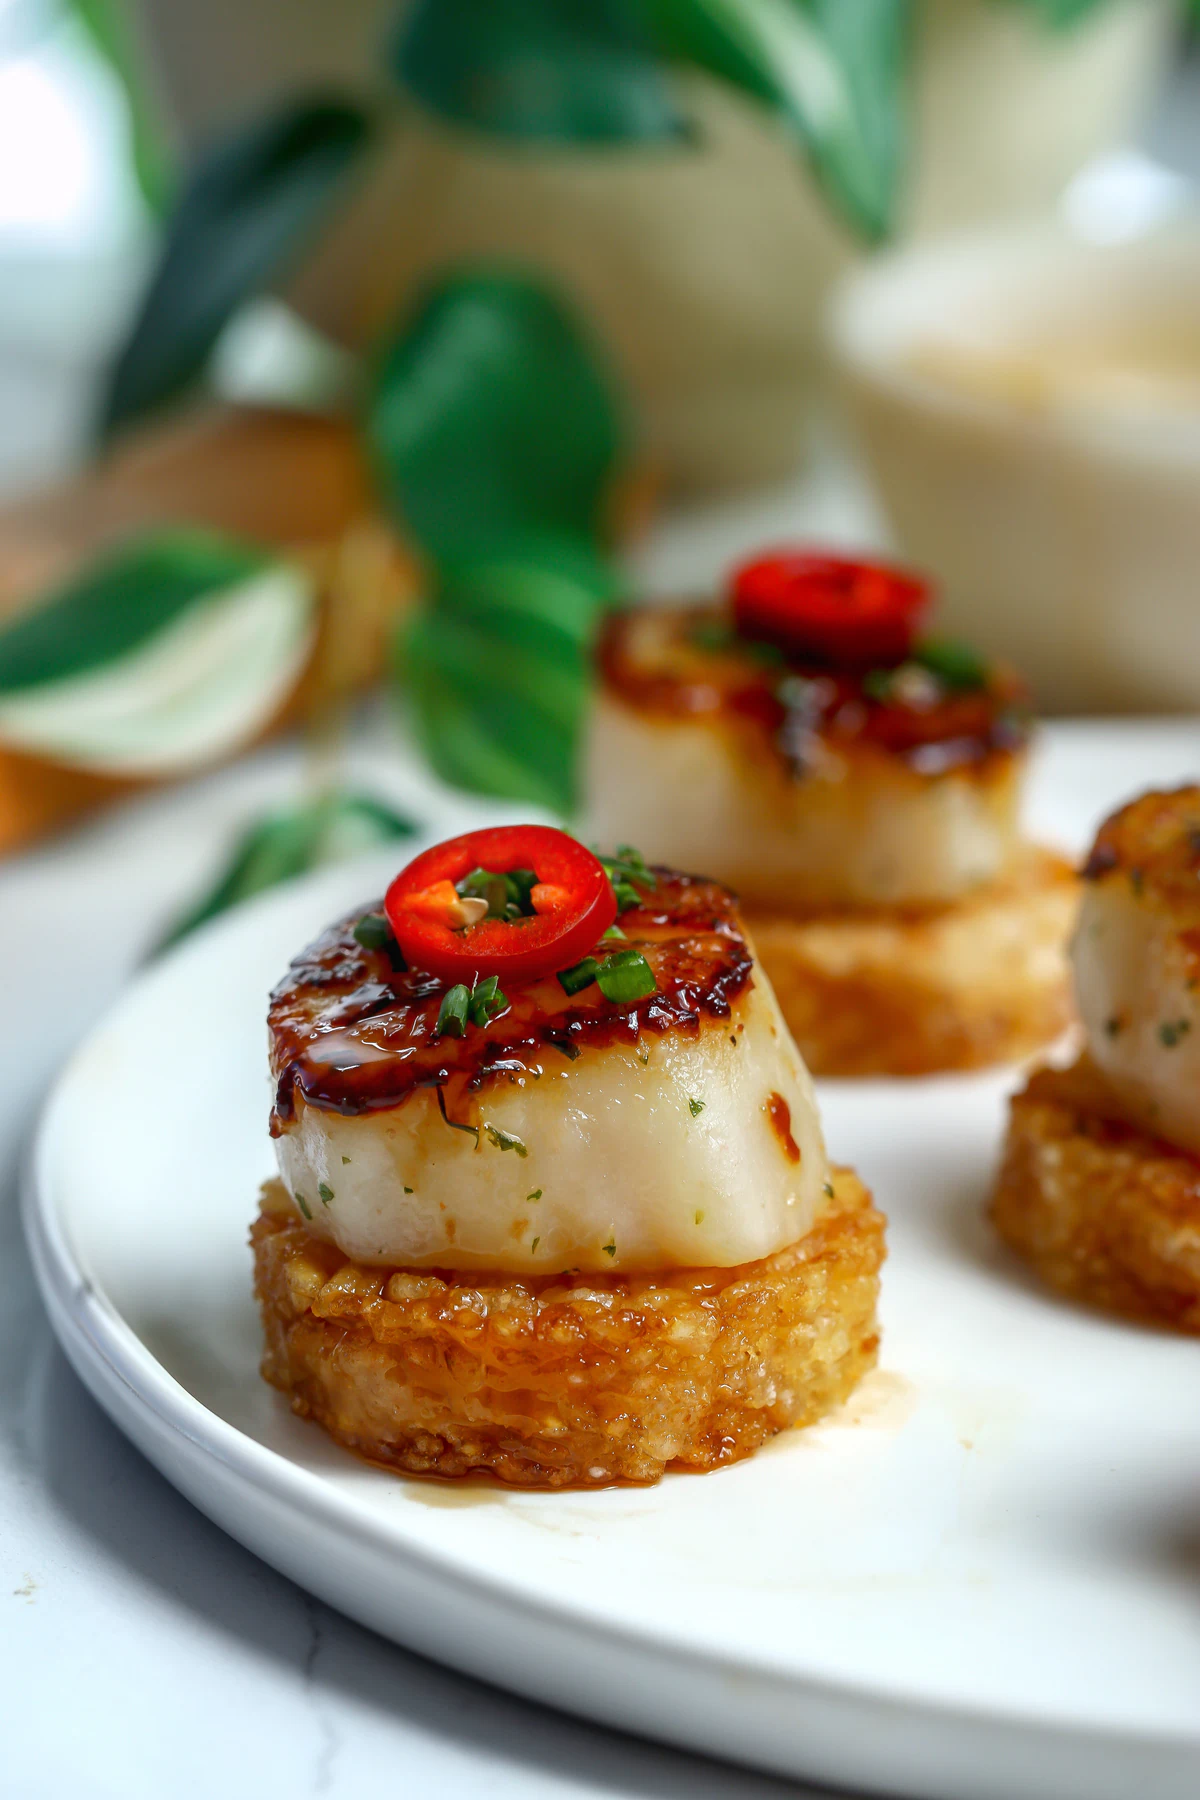
Table of Contents
About the Taste
It’s no secret I’m obsessed with Nobu’s crispy rice. This variation sears plump U-10 scallops and serves them on fried crispy rice bites. The Calrose rice is seasoned with kombu and rice vinegar giving you a mild, savory depth that pops when you bite into the crispy outside. The scallops have a buttery, melt-in-your-mouth middle with a golden, caramelized sear on the outside. The sauce really brings it home for me, the sriracha and agave create a sweet heat, and whisking in the butter makes it rich and smooth so it really clings to the scallop and in between the rice. Finishing it with a Fresno chile and chives adds a sharp, crisp flavor that rounds out the whole bite perfectly.
Everything You Need To Know About Buying Scallops
To achieve a restaurant-quality sear, the quality and size of your scallops are just as important as your pan temperature. If you have never purchased them before, here is everything that you need to know about buying the perfect scallop for your crispy rice.
What “U-10” Means
In the seafood industry, scallops are sold by weight-based size categories. The “U” stands for “under,” so U-10 means there are fewer than 10 scallops per pound. These are the largest, meatiest “colossal” sea scallops available. If you cannot find U-10, look for U-12 or U-15; they are slightly smaller but still large enough to hold up to a sear while keeping the insides buttery. Avoid bay scallops, these are tiny (70–120 per pound) and better suited for stews than searing.
Dry vs. Wet Scallops
This is the most critical distinction for this recipe.
- Dry Scallops: These are natural, wild-caught, and untreated. They have a creamy, pale pink, or tan hue and a slightly sticky surface. Because they contain no added water, they caramelize beautifully into a golden-brown crust.
- Wet Scallops: These are treated with sodium tripolyphosphate (STPP) to extend shelf life and increase water weight. They appear bright white and “plump,” but they will release excess moisture in the pan, essentially steaming the scallop instead of searing it. If you are planning on searing your scallops and you want that gorgeous crust, you have to buy dry scallops.
Freshness and Quality Checks
- The Smell Test: Fresh scallops should smell like the clean, salty ocean. Avoid anything with a “fishy” or pungent odor.
- Texture: The meat should be firm and spring back when touched. If they feel mushy or slimy, they are likely old.
- Frozen is Fine: If you don’t have access to a high-end fish market, individually quick-frozen (IQF) dry scallopsare often better than “fresh” scallops that have been sitting in a display case for days. Just ensure they are labeled “dry-packed” or “chemical-free”.
Ingredient Swaps
- Sushi Rice: You can use any medium grain white rice, though Calrose is the standard for getting that specific stickiness and crunch. If you are in a pinch, arborio rice is a decent backup because of its high starch content.
- Tamari: Feel free to use traditional soy sauce or liquid aminos if you do not have a gluten sensitivity. Coconut aminos also work well if you want a slightly sweeter profile with less sodium.
- Agave Syrup: Honey or maple syrup are great replacements for the agave in the sauce. Just keep in mind that honey will be slightly thicker and maple syrup will add a hint of woodsy flavor.
- Sriracha: If you cannot find sriracha, sambal oelek or any thick chili garlic paste provides a similar heat. You can also use gochujang, but it will make the sauce a bit more savory and fermented.
- Fresno Chiles: Red jalapeños are the best substitute since they have a similar heat level and bright color. If you want something milder, thinly sliced red bell pepper gives you the look without the spice.
- Potato Starch: Cornstarch or arrowroot powder are perfect functional swaps to help bind the rice. They both provide that same structural insurance needed to keep the rounds from falling apart in the skillet.
- Kombu: You can find dried kombu at most Asian grocery stores or in the international aisle of well stocked supermarkets. If you cannot find it, you can omit it, but adding a splash of dashi powder to the rice water helps mimic that ocean flavor.

Want to save this recipe to your collection?
Crispy Rice Variations
If you want more in depth instructions on how to make sure the rice holds together and you get the perfect crispy bite, I have an entire How to Make Perfect Crispy Rice (The Master Guide).
- Crispy Rice with Spicy Tuna – This is my original that went completely viral. It’s a classic spicy tuna on top of a bed of crispy rice.
- Tamari-Cured Confit Yolks Over Crispy Rice – Rich, jammy yolks cured in tamari for a deeply umami bite.
- Scallop Crispy Rice – Sweet, tender scallops with a clean, restaurant-style feel.
- Smoked Salmon Crispy Rice – Smoky, briny salmon with a creamy contrast.
- Tuna Crispy Rice – Clean, simple tuna that lets the rice shine.
- Salmon Crispy Rice – Fresh salmon with a buttery texture.
- Spicy Salmon Crispy Rice – Salmon mixed with a spicy, creamy sauce.
- Toro Crispy Rice – Fatty tuna with an ultra-rich, melt-in-your-mouth bite.
- Salmon Crispy Rice Balls – Bite-sized rice balls topped with salmon for a different format.
Scallop Crispy Rice FAQ
Yes, and you actually should. For the best results, the sushi rice needs at least 8 hours in the fridge to set properly. This cold rest ensures the grains stick together so you can cut clean rounds and fry them without the rice falling apart in the pan.
This recipe is very easy to keep gluten free. Simply use the Tamari instead of standard soy sauce and ensure your sriracha and rice vinegar brands are certified. Calrose rice, scallops, agave, and kombu are all naturally gluten free ingredients.
Dry scallops are natural and untreated, which is why they get a perfect golden sear. Wet scallops are treated with a chemical solution that makes them hold excess water. When you cook wet scallops, that water leaks out and steams the meat, preventing it from getting crispy.
Scallops usually stick if the pan is not hot enough or if they are still too damp. Make sure to pat them very dry with a paper towel and wait for the oil to be shimmering before adding them. Once they hit the pan, do not move them until they naturally release, which indicates a good crust has formed.
If the colossal U-10 size is unavailable, look for U-12 or U-15 sea scallops. These are slightly smaller but still large enough to sear beautifully. Avoid using small bay scallops for this Scallop Crispy Rice since they are too tiny to sit properly on the rice rounds.
You do not need a round cutter to get the job done. You can easily slice the chilled rice block into squares or rectangles with a sharp, wet knife. The most important part is pressing the rice firmly into the pan before it chills so the shapes keep their structure during the frying process.
Chef Nadia’s Tips For The Perfect Crispy Rice
- Don’t Skip the Starch: Adding a dusting of potato starch is the secret to getting a superior crust. It acts as a structural binder that prevents the rice from falling apart while creating a light, shatteringly crisp exterior.
- The Chill: You must refrigerate your pressed rice for at least 1 to 8 hours before frying. This cold rest allows the starches to set, ensuring you can cut clean shapes that stay compact when they hit the hot oil.
- Avoid Overcrowding: Only fry a few pieces at a time. If you crowd the pan, the oil temperature will drop too quickly, leading to rice that is greasy and hard rather than light and crispy.
- Hands Off: Once the rice is in the pan, do not touch it. It needs a full 2 to 3 minutes of undisturbed heat to develop a golden crust. It will naturally release from the surface once it is properly seared; if it’s sticking, it isn’t ready to flip yet.
Equipment
- fine mesh strainer
- rice cooker, or saucepan
- small bowl
- plastic wrap
- cans for weight
- 2 inch round cookie cutter
- heavy bottom skillet
Ingredients
The Crispy Rice
- 1 1/4 cup sushi rice, I used Calrose
- 1 2/3 water
- 1 pinch salt
- 1 kombu strip, optional
- 1/2 tbsp cane sugar
- 2 tbsp rice vinegar
- 2 tbsp potato starch
- avocado oil, for frying
The Scallops
- 8 U-10 scallops
- salt, to taste
- avocado oil, for frying
The Sauce
- 4 tbsp rice vinegar
- 2 1/2 tbsp agave syrup
- 2 tbsp sriracha
- 1 tsp sesame oil
- 1 1/2 tbsp tamari , or soy sauce
- 3 tbsp butter, unsalted, room temp
Toppings
- chives
- Fresno chiles , thinly sliced
Instructions
The Crispy Rice
- Prepare and Cook: Rinse the rice until the water runs mostly clear. Add the rice, water, kombu, and salt to a rice cooker or saucepan. Cook according to instructions. Discard the kombu.
- Season: Mix together sugar and rice vinegar until dissolved. Add into the hot rice along with the potato starch and stir until combined.
- Press and Chill: Line a rimmed baking sheet with plastic wrap. Press the rice firmly into an even layer about 1/4 to 1/2 inch thick. Cover with plastic wrap and place another baking sheet on top, pressing very well. Place weight on or of the baking sheet and refrigerate for 8-12 hours, then transfer to the freezer for 30 minutes so the rice is firm but not frozen solid.
- Cut and Fry: Remove the chilled rice slab and using a 2 inch round cookie cutter, cut out rounds. Heat about ½ inch of oil in a heavy bottomed skillet over medium heat. Fry the rice pieces in batches for 8 to 10 minutes, turning once, until deeply golden on both sides. Transfer to a rack or paper towels to drain.
The Scallops
- Prepare: Remove the foot from each scallop. Let the scallops sit at room temperature for about 20 minutes. Dry well and season lightly with salt.
- Sear: Heat a large skillet for about 3 minutes over high heat and then reduce to medium-high. Add enough oil to lightly coat the pan, and place the scallops in the skillet, giving them space. Sear without moving for about 3 minutes until deeply golden. Flip and cook for about 1 minute more. Remove from pan.
The Sauce
- In that same pan, add rice vinegar and let it reduce a bit. Then, add in agave, sriracha and sesame oil. Let that reduce by about 1/3. Add in tamari and cook another 30 seconds or until it thickens. Turn off the head and whisk in the butter until emulsified.
Assemble
- Spoon a bit of the sauce over the softer side of the crispy rice, top with a scallop, more sauce, chives, a Fresno pepper, and that is it!
Kitchen Cam
Nutrition
Nutrition information is automatically calculated, so should only be used as an approximation.


Thank you for sharing this recipe
You’re welcome Raewynn ☺️
This worked exactly as written, thanks!